
InDesign如何设置描边的线条样式-InDesign教程
软件分类:印刷排版大小:439.45 MB时间:2019-04-09
软件介绍:adobe indesign cc 2015是款专业的排版软件。adobe indesign cc 2015新增了多项实用功能,能够给用户带来前所未有的设计和发布体验,您可以比以往更清晰地查看工具栏、面板内容和对话框,字体和图标更大、更清晰,面板更有序,对话框更易于阅读。
学习如何在InDesign中设置描边线条样式吗?以下是详细的步骤教程,定会对你有所裨益。
1、首先在InDesign的对象中找到描边类型的属性。

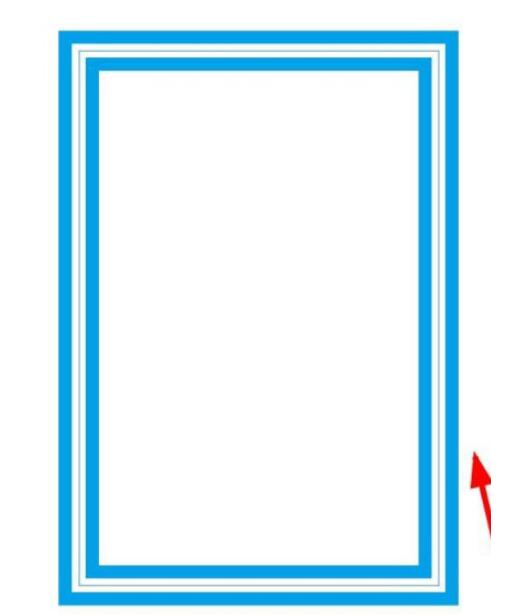
2、然后就能在这看到默认为实线。

3、因此,我们可以在这下拉选择更多的线条样式。

4、此时,我们可以用这种表现出空格的线框样式。
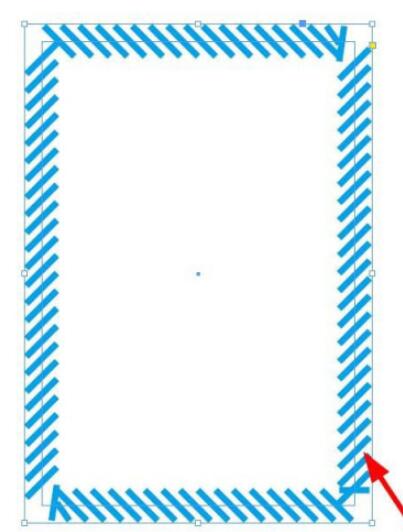
5、于是,我们还能使用这种斜线布局的线框。

6、这个时候也能使用其他的样式以达到更好的效果。
上文就讲解了InDesign设置描边的线条样式的方法,希望有需要的朋友都来学习哦。
文章标题:InDesign如何设置描边的线条样式-InDesign教程
文章链接://www.hpwebtech.com/jiqiao/91086.html
为给用户提供更多有价值信息,ZOL下载站整理发布,如果有侵权请联系删除,转载请保留出处。
相关软件推荐


其他类似技巧
- 2024-01-09 12:08:57InDesign导出PDF文件保留对页的效果的详细操作讲解
- 2024-01-09 11:52:13Indesign如何调整对象的透明度-Indesign使用教程
- 2024-01-09 11:52:12InDesign如何设置描边的线条样式-InDesign教程
Adobe Indesign CC 2015软件简介
adobe indesign cc 2015是款专业的排版软件。adobe indesign cc 2015新增了多项实用功能,能够给用户带来前所未有的设计和发布体验,您可以比以往更清晰地查看工具栏、面板内容和对话框,字体和图标更大、更清晰,面板更有序,对话框更易于阅读。
adobe indesign cc 2015新功能介绍:
1、段落底纹


